Step 2
Insert the first tetrahedral carbon building block. |
In the Segment window, Figure ![[*]](TUTORIALS/crossref.png) , press the carbon button in the periodic table of elements. The current element is displayed in large font above the periodic table. Also, all of the available building blocks for the current element are enabled in the Bond Configuration frame, directly above the periodic table.
, press the carbon button in the periodic table of elements. The current element is displayed in large font above the periodic table. Also, all of the available building blocks for the current element are enabled in the Bond Configuration frame, directly above the periodic table.
The tetrahedral building block is the default building block for carbon, and should already be selected. It is activated by the last available button in the second row in the Bond Configuration frame, Figure .
When selected the building block will appear in the Segment buffer, above the Bond Configuration frame. At this point your Segment window should look like the one in Figure .
| Note: The green semi-transparent atoms are dummy atoms. These only indicate a place for attaching other structures.
|
To insert the block into the build area, select the Add/Attach/Connect tool in the lower toolbar and click the left mouse button anywhere inside the build area.
| Tip: You may also insert into the Build window using the Default tool by right-clicking in the Build window.
|
At this point your Build window should contain a single building block shown in Figure

Build window with the tetrahedral carbon building block inserted
|
Step 3
Attach the second tetrahedral carbon building block. |
Confirm that the tetrahedral carbon building block in the Bond Configuration frame is still selected. Attach the building block to the structure in the build area by moving the mouse over the lower right dummy atom of the structure. The atom will be highlighted with a circle surrounding it and the cursor will change to  , indicating that this atom is a valid attachment point (Figure left image). Press the left mouse button over the the atom to attach the building block, (Figure right image).
| Tip: You may also attach the contents of the Segment buffer to the structures in the Build window using the Default tool by right-clicking over a compatible attachment point in the Build window.
|

Build window - attaching the second tetrahedral carbon building block
|
Step 4
Attach the Carboxyl functional group. |
Click on the Fragments tab in the Segment window, and then on the FUNCTIONAL GROUPS tab. Select the carboxyl fragment in the list on the left side of the window. The carboxyl functional group appears in the Segment buffer. Click on the left-most hydrogen atom in the group to set it as the attachment point for the fragment. The Segment window should now look like the one in Figure .

Segment window - Carboxyl functional group selected
|
Attach the Carboxyl group to the right-most upper dummy atom in the build area, by positioning the cursor over the atom until it is highlighted and clicking. The operation is shown in Figure .

Build window - attaching the Carboxyl group
|
Step 5
Attach the bent oxygen building block. |
In the Segment window select Building Blocks tab and then select oxygen in the periodic table. The list of available bond configurations changes. The default bent configuration for oxygen is automatically selected and the corresponding building block appears in the Segment buffer. We will use this block for the remaining O-H group needed.
In the Build window, attach the building block at the dummy atom on the center carbon closest to the double bonded oxygen, as shown in Figure .

Build window - attaching the bent oxygen building block
|
Step 6
Fill with hydrogens. |
The Hydrogen Fill tool is activated by the first button in the upper toolbar  . It replaces all the green, semi-transparent dummy atoms with real hydrogen atoms, right image in Figure
.
Build window - after Hydrogen Fill
|
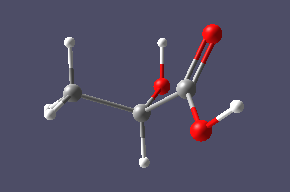
Finally, we finish building Lactic Acid by performing an initial energy . The second button in the top toolbar  executes the optimization. The result of the optimization is shown in Figure .

Build window - optimization results
|
Press the OK button to close the Optimization Progress dialog.
Step 8
Check for symmetry |
Use the Check Symmetry tool  , the third button in the top toolbar, to check for any point group symmetry. There is no symmetry in lactic acid and so the point group is C1, Figure .

Symmetry dialog
|
Press the OK button to close the Symmetry dialog.
[PREV] [NEXT]
